Immerse yourself in the captivating realm of Harry Potter with our compelling blog post on “Magical Harry Potter Decorations DIY,” which will leave your guests completely mesmerized. Come along with us as we embark on a creative adventure, revealing the magic behind crafting enchanting decorations inspired by the world of Harry Potter. These captivating creations will transport you to the mystical halls of Hogwarts.
Get ready to transform your living space into a magical realm with enchanting DIY creations. From a functional Weasley Family Clock to a whimsical Sorting Hat, these charming Harry Potter decorations DIY will bring a touch of wizardry into your home. And don’t miss the Floating Candles and the reasonably priced Platform 9 3/4 Brick Wall Harry Potter Decor, which will take you to a magical and fantastic place.
Table of Contents
The Weasley Family Clock
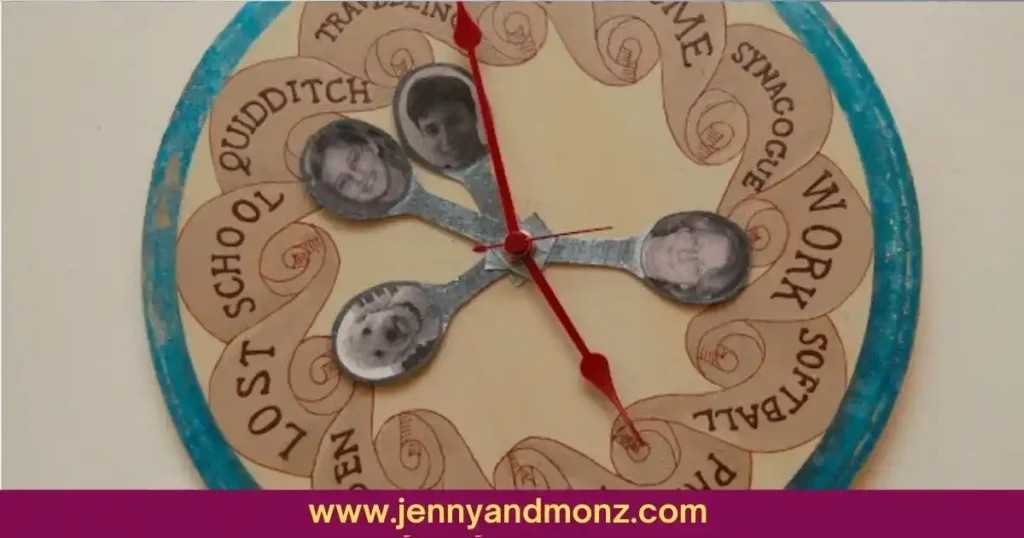
The enchanting clock of the Weasley family sparked the idea for this specific project. This magical timepiece cleverly shows the whereabouts of each family member with amusing labels like “mortal peril,” “lost,” and “quidditch.” To make this idea a reality, we created a working clock with images of the gift recipients instead of the Weasley family.
· Materials:
- Unfinished Wood Clock Face
- Acrylic Paints
- Fine Point Sharpie
- Clock Mechanism
- Thin Cardboard to create “Spoons”
- Silver Paint
- Pictures
- Glue
· Steps:
- We began with an unfinished wood clock face from the craft store and sketched a design on a paper circle. Our goal was to carefully plan 12 sections to ensure easy time-telling.
- Once the design was transferred onto the wood, we carefully applied acrylic paint to the shapes, delicately outlined them with a fine point sharpie, and infused them with playful labels.
- The clock mechanism was securely attached to the wood to ensure it wouldn’t rotate.
- To add a personal touch to the clock, we made “spoons” featuring unique faces that symbolize each family member. These were crafted from delicate Cardboard, painted with a shimmering silver hue, and embellished with miniature black and white images carefully affixed to the oval forms.
- The spoons were connected to the clock, enabling them to rotate separately from the clock’s hands.
The end product turned out to be a delightful and unique Weasley Family Clock that perfectly captured the enchanting atmosphere of the Harry Potter universe. We inspire others to embark on similar crafting adventures, reassuring them that creating a clock may seem daunting, but it is actually a simple and enjoyable process. There are countless opportunities for artistic expression with the blank wood canvas, enabling the design of one-of-a-kind clocks tailored to specific individuals or spaces.
DIY Harry Potter Sorting Hat

Embark on a captivating crafting journey and infuse your home with the enchantment of Hogwarts through this delightful DIY Harry Potter Sorting Hat project!
· Materials:
- Plain Hat:
- Hat with a suitable shape resembling the Sorting Hat.
- Acrylic Paints:
- Espresso or brown paint for the base color.
- Darker brown paint for shadows and highlights.
- Gold paint for dry brushing and detailing.
- Paintbrushes
· Steps:
In this post, we’ll share a shortened version of our enchanting adventure, where we turned a regular hat into a whimsical piece of magic.
- At first, we contemplated a bedazzled design, but then we came across the ideal shape for a Sorting Hat.
- Equipped with acrylic paint in the shade of espresso, we started the makeover.
- Taking inspiration from iconic Harry Potter images, we carefully sketched and molded the hat, aiming to capture its whimsical essence.
- Introducing a deeper brown shade, shadows, and highlights were added to bring the Sorting Hat to life.
- The final detail, which gave the hat its distinct Harry Potter charm, was the application of gold paint by dry brushing.
- With great attention to detail, we crafted the hat’s face to perfectly capture the essence of the iconic scenes from the series. Our creation truly embodies the beloved Sorting Hat.
Our finished Sorting Hat proudly adorns our office shelf, showcasing its exquisite gold accents highlighting its key features.
Platform 9 3/4 Brick Wall Harry Potter DecorAtions diy

Elevate your living space with a captivating and affordable DIY project that brings the magic of the Harry Potter universe to life – a Platform 9 3/4 Brick Wall Decor.
· Materials:
- Bed Sheet in a Cream Colour:
Consider choosing a cream-colored bed sheet, whether brand new or from a thrift store, based on the size of the wall you wish to cover.
- Red Paint:
Any red paint will work, but fabric paint is recommended for its durability and versatility.
- Sponge:
Opt for a sponge with small holes similar to a brick.
- Container:
A convenient vessel for holding the paint and sponge while crafting.
- Drop Sheet:
To protect the workspace, place a drop sheet behind your bed sheet.
- Rubber Gloves:
Remember to wear gloves to keep your hands clean while painting.
· Steps:

- Using the drop sheet, place the cream-colored bed sheet on top of it, smoothing out any creases to make a perfect canvas.
- Fill half the container with red paint, creating a convenient area for dipping the sponge.
- Immerse the sponge into the paint and remove any excess on the opposite side of the container.
- Gently press the sponge onto the sheet, ensuring a small gap between each brick. After completing a complete line, repeat this step.
- Proceed to the Second Row and position the sponge between the spaces created by the two bricks above it. Maintain a finger-width space between each row and apply pressure on half of the sponge for the edges.
This technique is simple and effective, capturing the essence of the iconic Platform 9 3/4 brick wall.
Floating Harry Potter Candles in a Starry Sky

· Materials:
- Towel or wrapping paper tubes to divide into halves for every candle.
- Hot glue gun to add wax drips along the sides.
- Red paint to create a realistic burning effect on the candles.
- Cardboard to cut circles for the bottom.
- Acrylic paints to provide a realistic appearance.
- Fishing line for invisible hanging.
- Plastic candle to contain within every tube.
- Tape to secure the plastic candle inside.
· Steps:
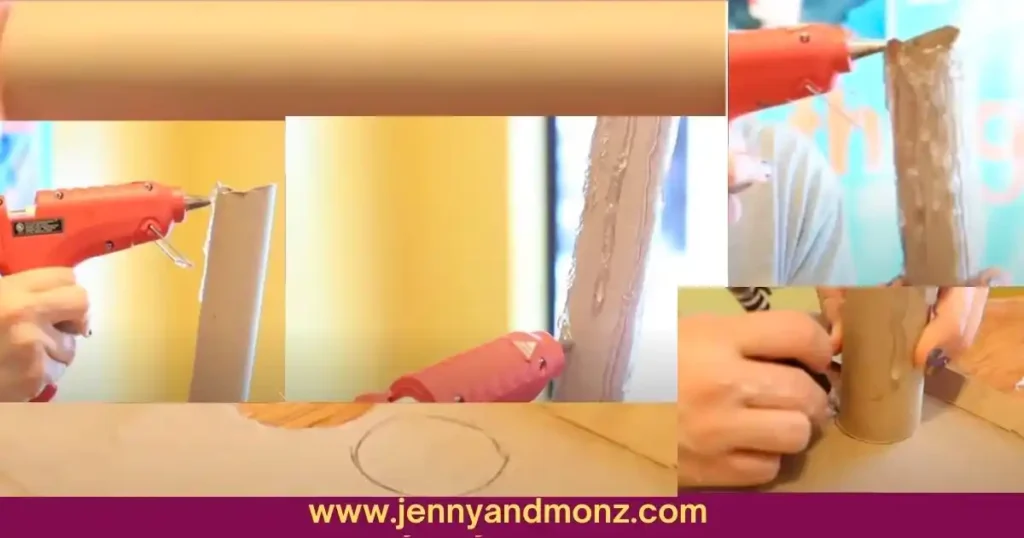
- Cut paper towels or wrapping paper tubes to the appropriate candle lengths.
- Enhance the authenticity of each tube by using a hot glue gun to create realistic wax drips along the sides.
- Use red paint to give the candle tubes a weathered and vintage look.
- Apply paint in longer strips with an uneven finish to create a natural, melting wax effect.
- Apply multiple layers of paint to add depth and achieve the appearance of candles that have been burned repeatedly.
- Secure a circular piece of Cardboard to the bottom of each tube to add stability and give the candle a polished finish.
- Craft a mesmerizing night sky backdrop by utilizing plastic tablecloths.

- Apply shiny metallic blue, grey, and red paint onto the tablecloths with a sponge to create a celestial effect.
- Create a stunning backdrop by splatter-painting it with a mix of gold, white, red, and blue paint, giving it a starry appearance.
- Focus on clusters to achieve a galaxy-like appearance.
- Create a small opening near the upper part of each tube by using a needle or nail.
- Insert the fishing line through the hole to create a hanging effect that is virtually invisible.
- Secure the plastic candle inside the tube by placing a strip of tape horizontally across it. This will keep the plastic candle centered and prevent it from leaning or falling.
- Hang the completed candles from the ceiling using the fishing line, creating a captivating and whimsical atmosphere in your space.
Experience the enchantment of Harry Potter decorations DIY with these incredible floating candles! Stay tuned for a delightful dose of magic and imagination in your crafting escapades.
Wrapping up:
As you wrap up your creative journey of Harry Potter decorations DIY, envision the joy that will fill your guests’ hearts when they enter a realm where enchantment becomes a reality. Add a touch of Harry Potter charm to your space with the Weasley Family Clock, the Sorting Hat, and the Platform 9 3/4 Brick Wall. These magical items will showcase your creativity and serve as a testament to your love for the enchanting world.
And don’t overlook the captivating Floating Harry Potter Candles, which bring the stunning night sky right into your home. Stay tuned for a delightful journey into the world of crafting, where we explore the enchanting realm of DIY creations. Join us as we bring the magic of Harry Potter to life in your very own home!
Frequently Asked Questions (FAQs)
· How can I add a touch of Harry Potter to my decor?
Easily integrate Gothic-inspired elements such as iron light fixtures, antique furnishings, and the distinctive colors of your home. Incorporate captivating elements such as floating candles and artwork that draw inspiration from the series.
· How can I decorate my room to resemble Hogwarts?
You can add banners that complement the room’s color scheme or incorporate authentic-looking items from books or movies. Alternatively, if budget is a concern, you can quickly spruce up your walls with eye-catching posters. Another idea is to consider adding statues or toys representing your house’s animal!
· Which room in Harry Potter is considered the best?
While Hufflepuff may not be everyone’s top choice in Hogwarts Legacy, it’s hard to deny that its common room stands out among the rest.
· What is the Hogwarts style?
Since Hogwarts was formed in the tenth century, it is reasonable to suppose that it was constructed in a Romanesque style. Hogwarts generally appears Romanesque in the games and diverse Gothic styles in the films. Not much information is provided in the novels besides the fact that it is an old castle.
· Which colors correspond to each house in Harry Potter?
The Gryffindor house (red and gold) is associated with the element of fire, while Slytherin is connected to water. Hufflepuff represents earth with its colors of yellow and black, symbolizing wheat and soil. On the other hand, Ravenclaw is linked to air through its blue and bronze shades, representing the sky and eagle feathers.